This menu allows you to manage your course settings. It contains following options:
o Course Teachers
o Category
o Publishing
o Course Options
o Certificate Templates
o Scale Templates
See detailed description for each option below.
Use this option to specify teachers for the course. To access, go to Site Actions > Site Settings > Course Settings>Course Teachers. The following page will be opened:
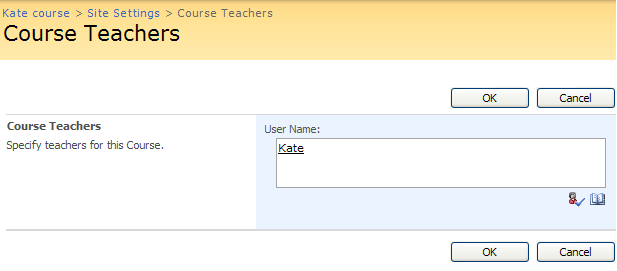
Fig. ‘Course Teachers’
Use the Browse icon ( ) to select teachers from the directory service. Click OK to save changes or Cancel to discard changes.
This menu allows you to specify category for your course, which makes it easier to search for the course. To access, go to Site Actions >Course Settings >Category. The following page will appear:
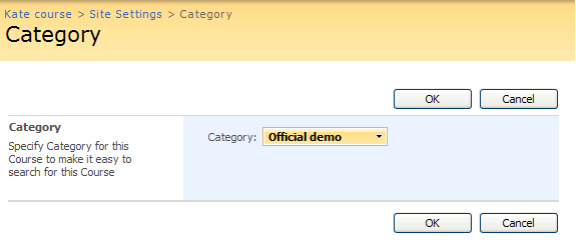
Fig. Category Page
To change category for your page click the Category button and select Change Category. The Select Category dialog window will appear. Select the desired category and click OK in the Select Category dialog window, then click OK at the top or at the bottom of the Category page to save changes. Click Cancel to discard changes.
This option allows you to set publishing options for your site. To access, go to Site Actions > Course Settings > Publishing. The following page will appear:
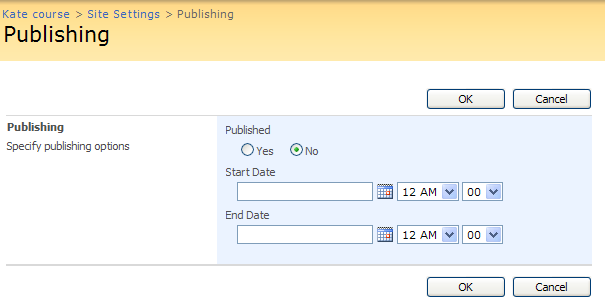
Fig. Publishing Page
Fill out the form fields as follows:
- Select Yes to publish your course. Select No if you don’t want to publish the course.
You may specify publishing start date and end date:
- Select the Yes radio button;
- Use the drop-down calendar against the Start Date field to specify publishing start date. From the drop-down lists select publishing start time;
- Use the drop-down calendar against the End Date field to specify publishing end date. From the drop-down lists select publishing end date.
Click OK to save publishing settings, click Cancel to cancel the operation.
On the Course Options page you may enable or disable options for course administrators and learners. To access the page, go to Site Actions> Course Settings>Course Options.
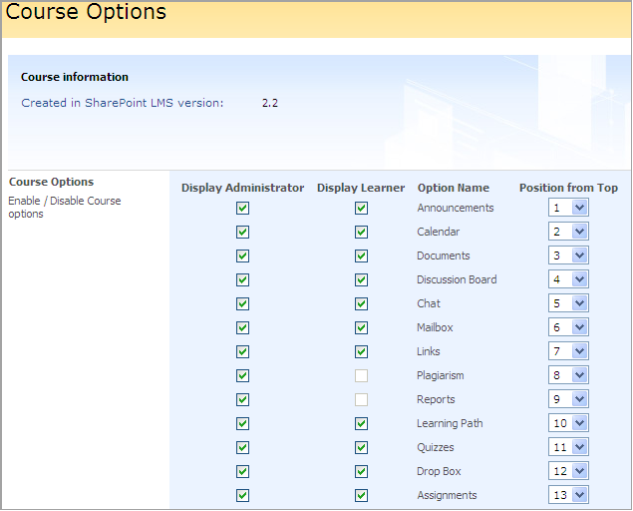
Fig. Course Options
|
Note: |
Disabling feature on the organization level will not delete it on the course level, i.e. tool information (including tool webparts) will remain. |
|
Note: |
Disabling a tool on the course level will hide the data it contains. To make the data visible, enable the tool once again. When a tool is disabled, user still can access it via a direct link. Teachers are allowed to hide Learners and Groups, Gradebook and Documents tools (not possible in version 2.0) as well as other tools. Learners are allowed to hide the Documents and Gradebook tools (not possible in version 2.0) as well as other tools. The Learning Path tool is visible if either all or some of its items (a SCORM, an LRM or a Learning Path) are enabled. If some item is disabled, the link will not be available on the Create page either. |
On this page you see two lists: Course Administrator (Teacher) Options, Learner Options.
- From the Course Administrator (Teacher) Options list select the options which you want to enable for course administrators.
- From the Learner Options list select the options which you want to enable for course learners.
- To disable an option, clear the checkbox against it.
Click OK to save changes or Cancel to discard changes.
33.4.5 List Publishing Scheduler
To open List Publishing Scheduler choose Site Actions>Site Settings> List Publishing Scheduler link in “Course Settings” section.
The option allows making a schedule for lists viewing, i.e. you can specify a period when learners will have permissions to view the lists.
Setting permissions
To set permissions:
- Click New at the top of the page.
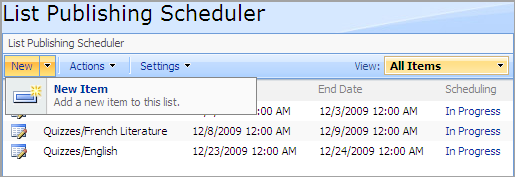
- The following window will appear. Fill in the fields as required:
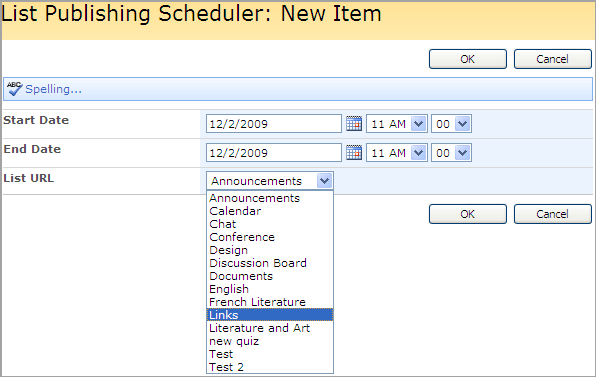
· Choose start and end dates for the list publishing.
· Choose an item you set permissions for.
· Click OK to confirm the settings. Click Cancel to discard changes.
|
NOTE: |
When setting an item publishing period via the Publishing option in the Quiz Settings menu the item appears in the List Publishing Scheduler automatically. |
On this page you can create and manage certificate template for your course. To access the page, go to Site Actions>Course Settings>Certificate Templates.
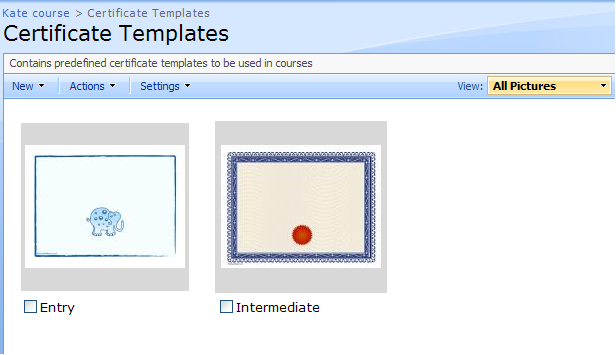
Fig. Certificate Templates
This page contains all certificate templates.
|
TIP: |
By default all certificate templates thumbnails are shown. From the View menu select the necessary view (select Explorer View to load a standard Windows Explorer window into the workspace area). To view only desired certificates: - Select checkboxes against the certificates you want to view; - From the View list select Selected Pictures.
To view certificate templates as a list: - In the View menu point over all pictures. A submenu will appear. - Select Details.
To switch to the filmstrip view: In the View menu point over all pictures. A submenu will appear. Select Filmstrip.
|
Managing Certificate Templates
To manage certificate templates:
- Go to Site Actions>Course Settings>Certificate Templates;
- Select the checkbox against the item you want to manage;
- From the Actions menu select the desired action:
o Select Edit to open the selected certificate template in a picture manager;
o Select Delete to delete the selected certificate template;
o Select Download to copy the selected certificate template to your computer;
o Select Send to insert the selected certificate into an e-mail or a document;
o Select View Slide Show to view certificate templates in a slide show format;
o Select Open With Windows Explorer to open the files with Windows Explorer;
o Select View RSS Feed to syndicate items with an RSS reader;
o Select Alert Me to receive e-mail notifications when items change.
Creating Folders
You may create folders to organize certificate templates. To create a folder:
- Go to Site Actions>Course Settings>Certificate Templates;
- Click the New button and select Folder;
- In the Name field enter the name for the folder and click OK.
Creating Certificate Templates
The system allows you to create course certificate templates, quiz certificate templates, learning path certificate templates and Scorm certificate templates.
To create a new certificate template:
- Go to Site Actions>Course Settings>Certificate Templates;
- Click the New button and select the certificate template you want to create:
· Select Course Certificate Template to create a new course certificate template;
· Select Quiz Certificate Template to create a new quiz certificate template;
· Select Learning Path Certificate Template to create a new learning path certificate template;
· Select SCORM Certificate Template to create a new SCORM certificate template;
· Select LRM Certificate Template to create a new LRM certificate template.
- Use the Browse button to upload the desired certificate template from your computer:
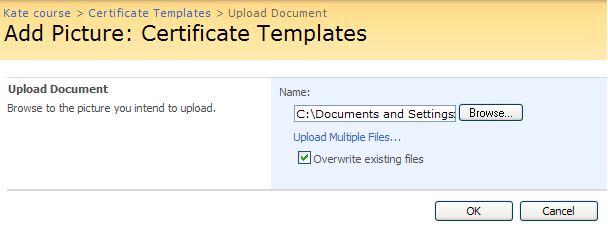
Fig. ‘Uploading Certificate Template’
- Select the Overwrite existing files to overwrite the files in the system;
- Click OK to save changes. The Edit Item form will appear:
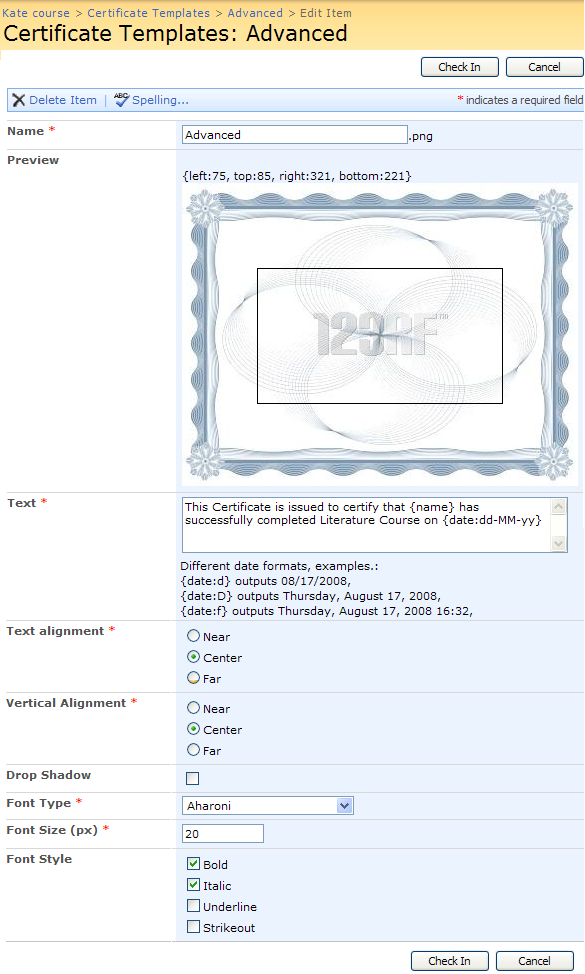
Fig. ‘Creating Certificate’
- Fill out the form as described below (fields marked with an asterisk are required to be filled out):
Name – enter the name of the certificate;
Preview – use your mouse to set text area.
Text – enter the text that will be placed in the defined area on the certificate template. You may use variable that are described in the form;
Text alignment – check the necessary radio button of either Near, Center or Far to set the text alignment;
Vertical alignment – check the necessary radio button of either Near, Center or Far to set the vertical alignment;
Drop Shadow – select this checkbox if you want the text to drop shadow.
Font Type – Select from the drop-down box the font type for the text of the certificate.
Font Sixe (px) – input the font size of the text;
Font Style – check the boxes next to the necessary font styles that you wish to add.
When finished, press Ok either at the top or at the bottom of the page to save the certificate; press Cancel to discard the changes.
Certificate Variables
The Certificate text field allows you to use the following variables (the variables will be replaced by specific data later on for each particular student):
|
Variable |
Description |
|
{name} and {username} |
When the certificate is generated, {name} and {username} are automatically changed to the name and username of the user who did the quiz. |
|
{course} |
When the certificate is generated, the {course} variable is automatically changed to the name of a corresponding course. |
|
{date} |
When the certificate is generated, the {date} variable is automatically changed to the date when the certificate was issued. Note: For the {date} variable you can use various date formats, for example: - {date:D} outputs Thursday, August 17, 2000, - {date:f} outputs Thursday, August 17, 2000 16:32, - {date:F} outputs Thursday, August 17, 2000 16:32:32, - {date:g} outputs 08/17/2000 16:32, - {date:G} outputs 08/17/2000 16:32:32, - {date:m} outputs August 17, - {date:r} outputs Thu, 17 Aug 2000 23:32:32 GMT, - {date:s} outputs 2000-08-17T16:32:32, - {date:t} outputs 16:32, - {date:T} outputs 16:32:32, - {date:u} outputs 2000-08-17 23:32:32Z, - {date:U} outputs Thursday, August 17, 2000 23:32:32, - {date:y} outputs August, 2000, - {date:dddd, MMMM dd yyyy} :Thursday, August 17 2000, - {date:ddd, MMM d "'"yy} :Thu, Aug 17 '00, - {date:dddd, MMMM dd} :Thursday, August 17, - {date:M/yy} :8/00, - {date:dd-MM-yy} :17-08-00. |
This option allows you to create and manage scale templates which are used in courses Grade Book. To open the Scale Templates section, go to Site Actions>Course Settings>Scale Templates. A list of existing items will appear.
An Item is an aspect (or a field of activity) for which Students can get a certain grade. First you should create scale templates items in the Scale Templates section. After that you can use these items when you create quizzes, assignments with grade etc.
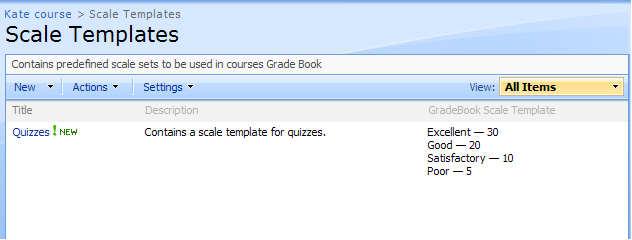
Fig. ‘Scale Templates Page’
Creating Scale Templates Items
Go to Site Actions>Course Settings>Scale Templates;
Click the New button and select New Item.
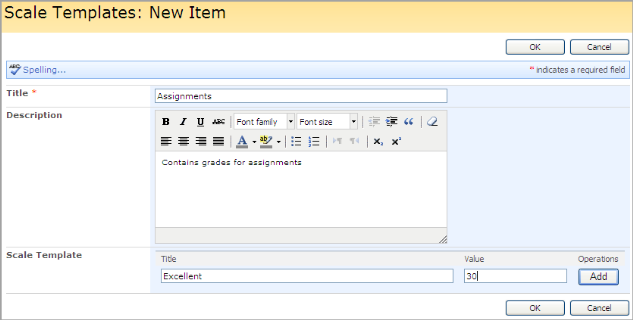
Fig. ‘Creating Scale Templates Item’
Fill out the form fields as described below:
- In the Title field enter the title for the scale templates item.
- In the Description field enter description for the scale template item.
- In the Scale Template section to add grades to the scale templates item
o In the Title field specify the name of the grade as it will be shown to students;
o In the Value field enter the grade value, %.
o Click Add to add the grade.
|
NOTE: |
You can edit or delete the grade you added. Click the Edit button against the grade to Edit it or the Delete button to delete the grade.
|

1. When finished press the Ok button either at the top or at the bottom of the page; to discard changes press Cancel.
Editing Scale Template Item
To edit a scale template item that was created earlier:
- Go to Site Actions>Course Settings>Scale Templates;
- Point over the necessary item and click the arrow.
- Select Edit Item from the drop-down menu.
- Modify the properties of the item.
- Save the changes.
Deleting Scale Template Item
To delete a scale template book item that was created earlier:
- Go to Site Actions>Course Settings>Scale Templates;
- Point over the necessary item and click the arrow.
- Select Delete Item from the drop-down menu.
- Confirm deletion.