9.3 Uploading SCORM compliant course content
The learning path tool allows you to upload SCORM compliant course contents. Currently 1.2 and 1.3 (2004) SCORM versions are supported.
SCORM (Sharable Content Object Reference Model) is a public standard followed by major e-Learning actors like NETg, Macromedia, Microsoft, Skillsoft, etc that acts at three levels:
· Economic level: SCORM allows whole courses or small content units to be reused on different Learning Management Systems (LMS) through the separation of content and context.
· Pedagogic level: SCORM integrates the notion of pre-requisite or sequencing (e.g. “You cannot go to chapter 2 until you pass Quiz
· Technological level: SCORM generates a table of contents as an abstraction layer situated outside the content and the LMS. It helps the content and LMS communicate with each other. Communication is performed by means of bookmarks (“Where is John in the course?”), scoring (“How did John pass the test?”) and time (“How much time did John spent in chapter 1?”).
To upload a SCORM package,
1. Enter the necessary course and press the Learning Path link in the left course menu.
2. Press the Create button in the header of the page.
3. Select SCORM.
4. In the opened form specify the fields as described below:
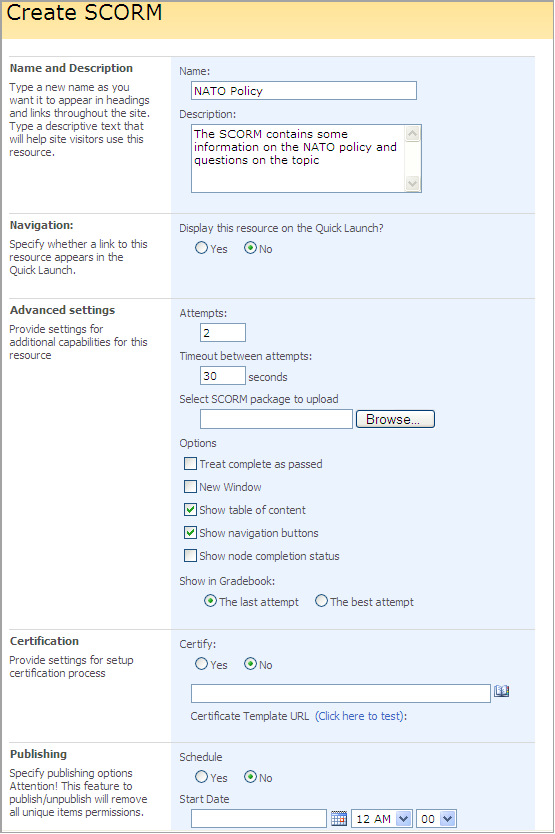
Fig. ‘Creating SCORM’
Fill out the form fields as described below:
- Name – enter the title for the SCORM;
- Description – enter description for the SCORM;
- Navigation – select Yes to display a link to the SCORM on the Quick Launch;
Advanced Settings
- Attempts – specify the number of attempts a user has to take the SCORM
- Timeout between attempts – specify the period between attempts
- Use the Browse button to upload the necessary SCORM package;
- Check Treat complete as passed to treat complete status as passed. (During the SCORM browsing, the package can send two different statuses to LMS – one status is assigned when user has clicked through and seen the SCORM (complete/incomplete) and the other indicates the SCORM progress (passed/failed). The option will give you ability to treat “complete” status as “passed” if SCORM doesn’t send the progress status to LMS.)
- Check New window if you want the SCORM to open in a new window.
- Check Show table of content to see the items the SCORM consists of;
- Check Show navigation buttons to be able to switch between the SCORM items
- Check Show node completion status for the current completion status of SCORM items to display
- Show in Grade Book – specify whether you want the last or the best attempt to display in the Grade Book section
Certification
- Certify – select Yes to enable certification for this SCORM. Use the Browse button to select certificate template for the SCORM.
Publishing
- Schedule – select Yes to schedule the SCORM for a specific date and time,
- In the Start Date field enter the start date. From the drop-down lists select hour and minutes when the learning path should be published.
- In the End Date enter the end date when publishing stops. Use the drop-down lists to specify end time.
Click OK to save the settings or Cancel to discard changes.
Once a SCORM is created, it appears on the Leaning Path page.
|
NOTE: |
Before you start saving a SCORM-package as a template, consider its size. If the package is 25 MB or larger, see the Saving SCORM as a Template section of Install and Management Guide. |