11.4 Adding Questions to Existing Quizzes
You may add questions to already created quizzes. To add a question,
- Enter the necessary course and click the Quizzes icon in the left Tools menu
- Point over the quiz you want to add a question to and select Settings. The Customize quiz page will appear.
- In the Quiz Questions section select Add Question
- Fill out the form fields (see Creating Quiz Questions)
- Save changes
Currently the system allows you to select among 10 types of questions:
- Drop Down Ordering
- Free Text Answer
- True of False
- Single Choice
- Short Answer
- Multiple Choice
- Hot Spot
- Matching
- Gap Fill
- Page Separator
Find below a detailed description of how to create each type of quiz questions.
11.4.1.1 DROP DOWN ORDERING QUESTIONS
The Drop Down Ordering question is a question which requires arranging items in the correct order. Each item is selected from a drop-down list.
|
NOTE: |
The correct order of items is the order you have typed them in the answer text boxes. |
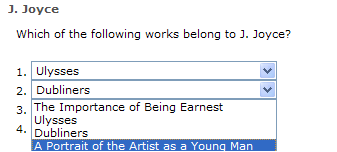
Fig. ‘DropDown Ordering Question’
To add a Drop Down Ordering question:
- Enter the necessary course and click the Quizzes icon in the left Tools menu.
- Hover over the quiz you want to add a question to and select Settings. The Customize quiz page will appear.
- In the Quiz Questions section select Add Question.
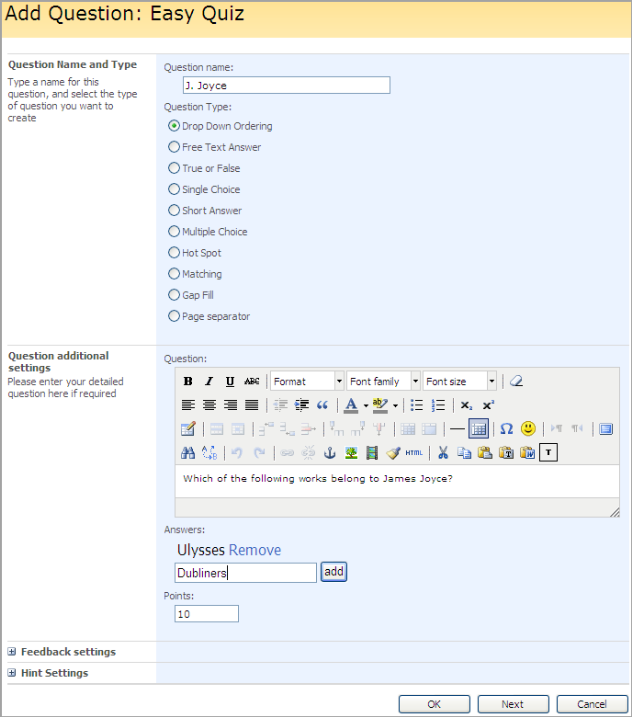
Fig. ‘Adding a DropDown Ordering Question’
- Fill out the form fields the following way:
o Question Name – enter the name of the question
o Question Type – select the Drop Down Ordering radio button
o Question – input the text of the question using the embedded editor to format the text
o Answers – define possible answer options. Click Add.
o Points - specify the number of points a user will get
o Feedback Settings – for more information about creating feedback messages, see Creating a Custom Feedback Message
o Hint Settings – enter a hint to help learners specify the right answer and the hint cost. If a hint is used, the number of question points will be reduced by the specified percent.
- Click Ok to save changes. Click Cancel to discard changes. Click Next to save the current item and continue.
11.4.1.2 FREE TEXT ANSWER
Free text answer question is represented as a question and an empty text field. Students should enter the answer into the text field. There are no defined correct answer options.
Fig. ‘Free Text Answer Question’
To add a Free text answer question:
- Enter the necessary course and click the Quizzes icon in the left Tools menu.
- Point over the quiz you want to add a question to and select Settings. The Customize quiz page will appear.
- In the Quiz Questions section select Add Question.
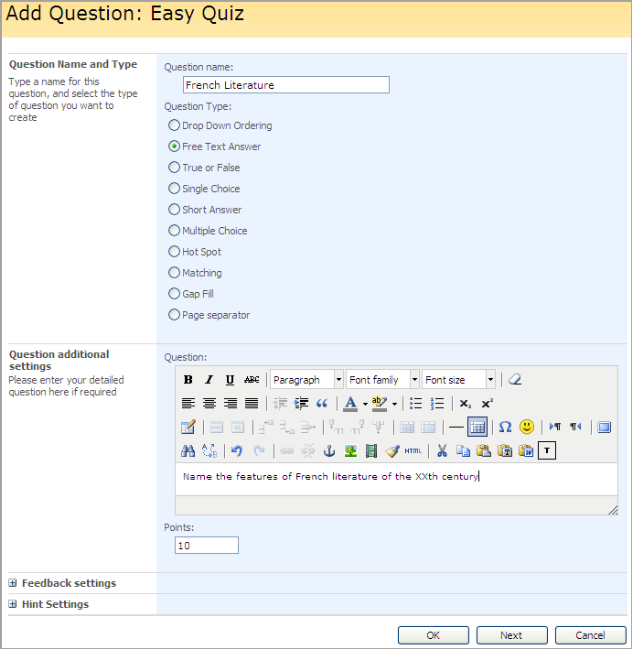
Fig. ‘Adding a Free Text Answer Question’
- Fill out the form fields the following way:
o Question Name – enter the name of the question
o Question Type – select the Free Text Answer radio button
o Question – input the text of the question using the embedded editor to format the text
o Points – specify the number of points a user will get for this answer
o Feedback Settings – for more information about creating feedback messages, see Creating a Custom Feedback Message
o Hint Settings – enter a hint to help learners specify the right answer and the hint cost. If a hint is used, the number of question points will be reduced by the specified percent.
- Click Ok to save changes. Click Cancel to discard changes. Click Next to save the current item and continue.
11.4.1.3 TRUE OR FALSE QUESTIONS
The True or False question is represented as a question itself and two radio buttons with answer options: true and false. Students can select only one answer option.
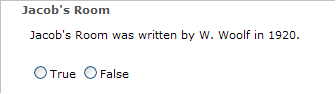
Fig. ‘True or False Question’
To add a True or False question:
1. Enter the necessary course and click the Quizzes icon in the left Tools menu.
2. Point over the quiz you want to add a question to and select Settings. The Customize quiz page will appear.
3. In the Quiz Questions section select Add Question.
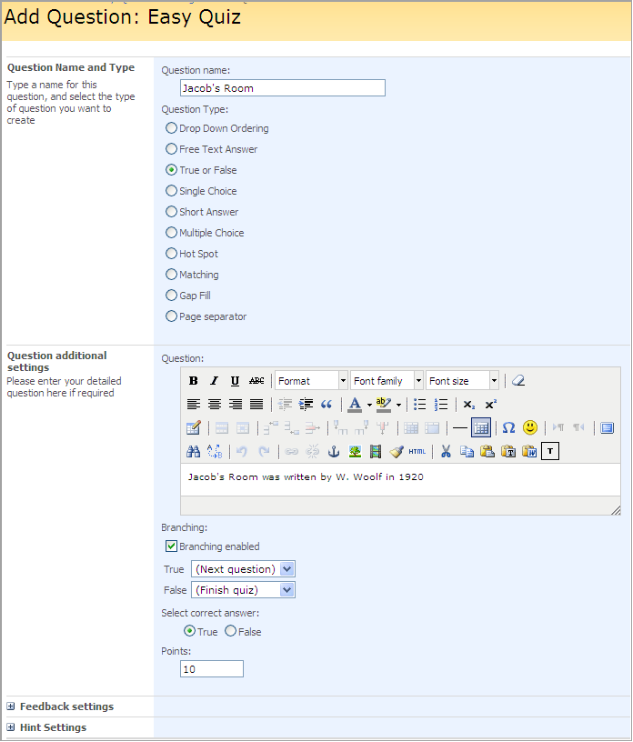
Fig. ‘Adding a True or False Question’
4. Fill out the form fields the following way:
o Question Name – enter the name of the question
o Question Type – select the True or False radio button
o Question – input the text of the question using the embedded editor to format the text
o Branching Enabled – select this checkbox to enable branching. Branching can be used to skip to a specific question based on the user response. A page break is automatically inserted after a question with branching enabled.
i. From the True drop-down list select the action which will be performed if the learner selects True
ii. From the False drop-down list select the action which will be performed if the learner selects False
o Select correct answer – select True or False as the correct answer
o Points – specify the number of points a user will get for the correct answer
o Feedback Settings – for more information about creating feedback messages, see Creating a Custom Feedback Message
o Hint Settings – enter a hint to help learners specify the right answer and the hint cost. If a hint is used, the number of question points will be reduced by the specified percent.
5. When finished press Ok to save changes; press Cancel to discard changes. Click Next to save the current item and continue.
11.4.1.4 SINGLE CHOICE
The Single Choice question is represented as a question itself and a group of radio buttons with answer options. Only one option may be correct.

Fig. Single Choice
To add a Single Choice question:
1. Enter the necessary course and click the Quizzes icon in the left Tools menu.
2. Point over the quiz you want to add a question to and select Settings. The Customize quiz page will appear.
3. In the Quiz Questions section select Add Question.
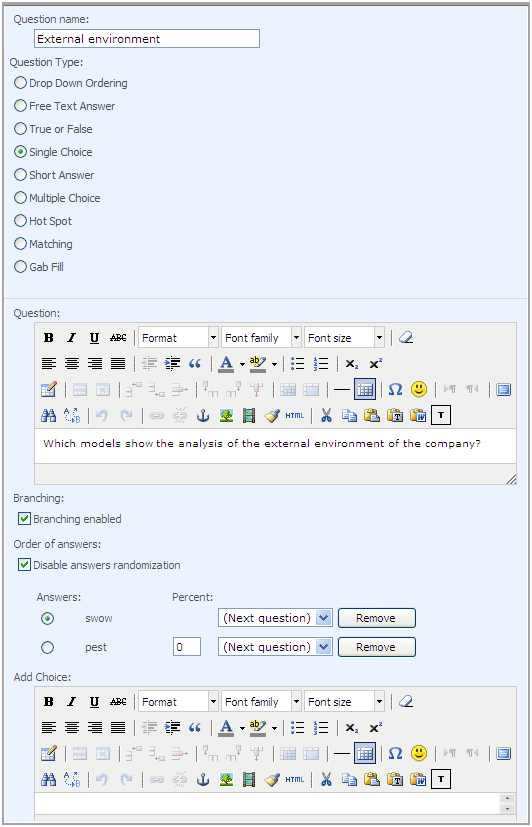
Fig. ‘Adding a Single Choice Question’
1. Fill out the form fields the following way:
- Question Name – enter the name of the question
- Question Type – select the Single Choice radio button
- Question – input the text of the question using the embedded editor to format the text
- Branching – check the box to enable branching
- Order of answers – check the box to disable answers randomization; answers are randomized by default. Note that questions are randomized within a page only.
- Answers – the answers you have typed in are displayed here. Select Next Question if you want user to proceed to the following question having entered the answer you’ve specified in the corresponding field. Select Finish quiz if you want user to finish quiz having entered the answer you’ve specified in the corresponding field.
- Percent – this field is available for wrong answer options. You may enter the percent this answer matches to the correct answer.
- Add Choice – enter the answer option. Click Add to add the answer option. To remove the answer option, press the Remove button next to the answer.
- Points – specify the number of points a user will get for the correct answer
- Feedback Settings – for more information about creating feedback messages, see Creating a Custom Feedback Message
- Hint Settings – enter a hint to help learners specify the right answer and the hint cost. If a hint is used, the number of question points will be reduced by the specified percent.
2. When finished press Ok to save changes; press Cancel to discard changes. Click Next to save the current item and continue.
11.4.1.5 SHORT ANSWER
The Short Answer question is represented as a question and an empty text field. Students should enter the correct answer into the text field.

Fig. ‘Short Answer Question’
To add a Short Answer question:
1. Enter the necessary course and click the Quizzes icon in the Course Tools menu.
2. Point over the quiz you want to add a question to and select Settings. The Customize quiz page will appear.
3. In the Quiz Questions section select Add Question.
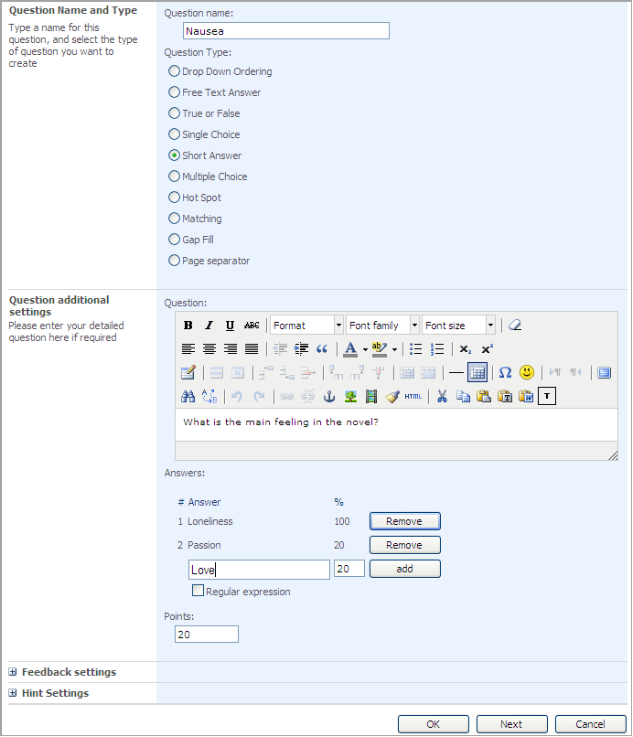
Fig. ‘Adding a Short Answer Question’
4. Fill out the form fields the following way:
o Question Name – enter the name of the question;
o Question Type – select the Short Answer radio button;
o Question – input the text of the question using the embedded editor to format the text;
o Answer – enter the answer option. In the % field enter the percent this answer matches to the correct answer. Click Add to add the answer option. Click Remove to remove the answers added before;
o Regular expression – check the box for user input validation and text reformatting (for example, short answer “input numbers 1 to 5” can be validated as [1-5] expression). For more information on regular expressions, see Regular Expressions as a Language;
o Points – specify the number of points a user will get for the correct answer;
o Feedback Settings – for more information about creating feedback messages, see Creating a Custom Feedback Message
o Hint Settings – enter a hint to help learners specify the right answer and the hint cost. If a hint is used, the number of question points will be reduced by the specified percent.
5. When finished press Ok to save changes; press Cancel to discard changes. Click Next to save the current item and continue.
11.4.1.6 MULTIPLE CHOICE
The Multiple Choice question is represented as a question itself and a group of check boxes with answer options. Here several options can be correct at the same time.
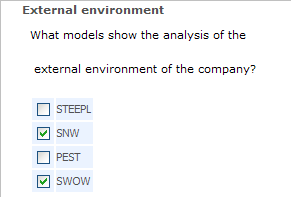
Fig. Multiple Choice
To add a Multiple Choice question:
1. Enter the necessary course and click the Quizzes icon in the left Tools menu.
2. Point over the quiz you want to add a question to and select Settings. The Customize quiz page will appear.
3. In the Quiz Questions section select Add Question.
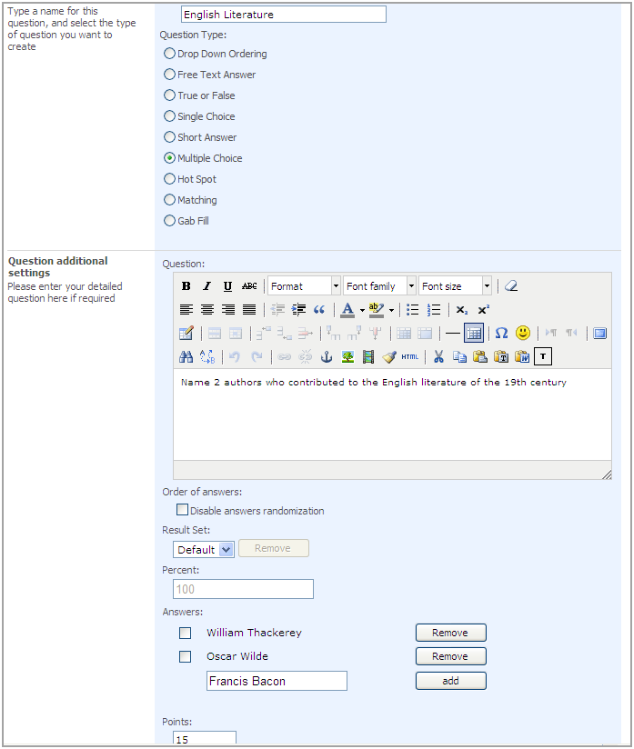
Fig. ‘Adding a Multiple Choice Question’
4. Fill out the form fields the following way:
o Question Name – enter the name of the question
o Question Type – select the Multiple Choice radio button
o Question – input the text of the question using the embedded editor to format the text
o Order of answers – check this box to disable answers randomization. Answers are randomized by default. Note that questions are randomized within a page only.
o Result Set and Percent – these fields are available for partially correct answer options. Select New in the Result Set field and enter the percent this answer matches to the correct answer in the Percent field.
o Answers – input the answer option using the embedded editor to format the text. Click Add to add the answer option.
o Points – specify the number of points a user will get for the correct answer
o Feedback Settings – for more information about creating feedback messages, see Creating a Custom Feedback Message
o Hint Settings – enter a hint to help learners specify the right answer and the hint cost. If a hint is used, the number of question points will be reduced by the specified percent.
5. When finished press Ok to save changes; press Cancel to discard changes. Click Next to save the current item and continue.
The hot spot question is represented as a question and an image. Students should point their mouse cursor to a certain area (spot) on the image and click it. If Students click within the right area, the question is considered to be answered correctly.
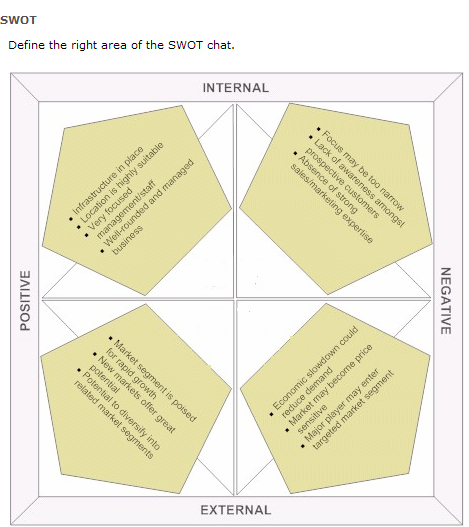
Fig. ‘Hot Spot Question’
To add a Hot Spot question:
1. Enter the necessary course and click the Quizzes icon in the left Tools menu.
2. Point over the quiz you want to add a question to and select Settings. The Customize quiz page will appear.
1. In the Quiz Questions section select Add Question.
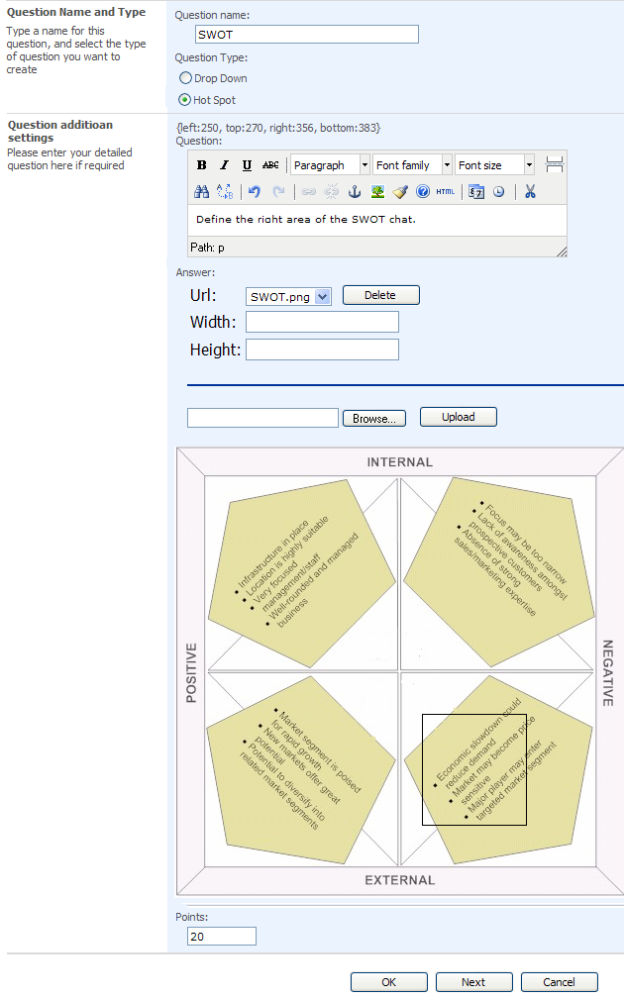
Fig. ‘Adding a Hot Spot Question’
2. Fill out the form fields as described below:
o Question Name – enter the name of the question
o Question Type – select the Hot Spot radio button
o Question additional settings– input the text of the question (if necessary) using the embedded editor to format the text;
o Click the Browse button to select an image for the question and press the Upload button. If you have already uploaded several images select one for the question from the Url drop-down list. Press the Delete button to delete the selected image. In the Width and Height fields specify the needed width and height of the image;
o To create a hotspot area click on the image once to start defining the hotspot; click for the second time to stop the selection
o Points - specify the number of points a user will get for the correct answer
o Feedback Settings – for more information about creating feedback messages, see Creating a Custom Feedback Message
o Hint Settings – enter a hint to help learners specify the right answer and the hint cost. If a hint is used, the number of question points will be reduced by the specified percent.
3. When finished press Ok to save changes; press Cancel to discard changes. Click Next to save the current item and continue.
The Matching question is represented as a group of questions and a group of answer options. Students should match questions with the correct answers by dragging and dropping answers onto the questions.
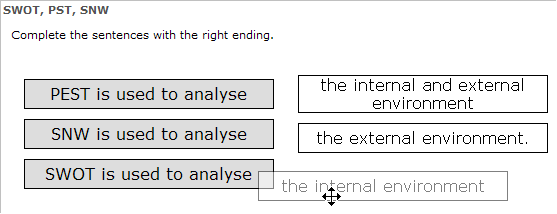
Fig. ‘Matching Question’
To add a Matching question:
1. Enter the necessary course and click the Quizzes icon in the left Tools menu.
2. Point over the quiz you want to add a question to and select Settings. The Customize quiz page will appear.
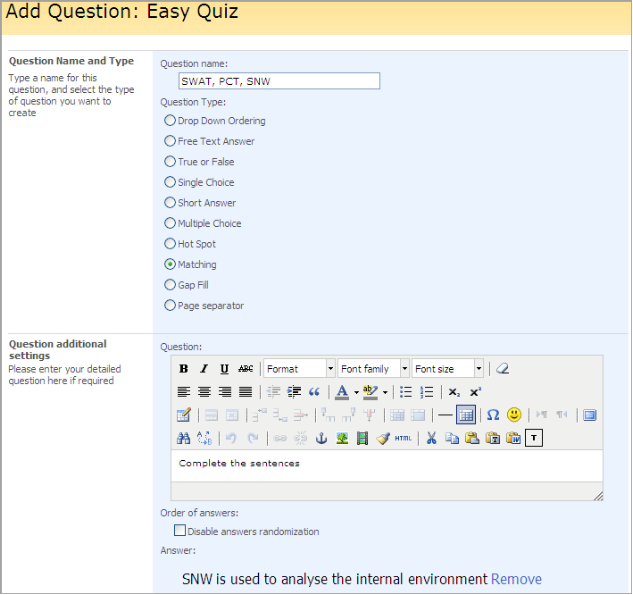
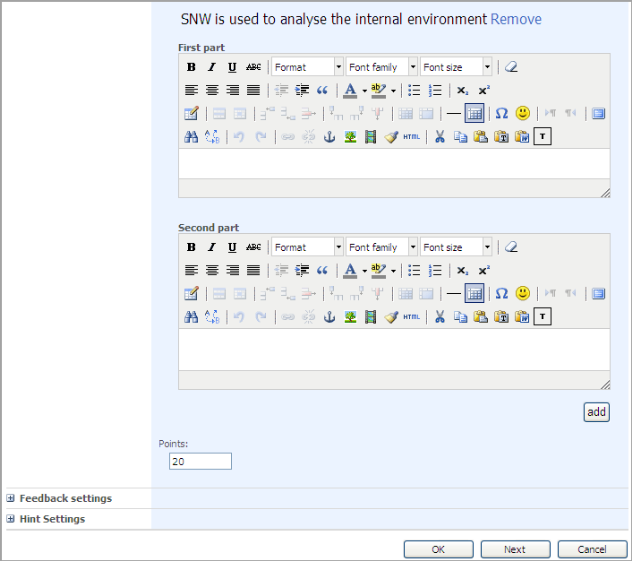
Fig. ‘Adding a Matching Question’
5. Fill out the form fields the following way:
- Question Name – enter the name of the question
- Question Type – select the Matching radio button
- Question – input the text of the question using the embedded editor to format the text
- Order of answers – check the box to disable answer randomization. The answers are randomized by default. Note that questions are randomized within a page only.
- Answer - enter an answer to the question. Click Remove to delete the answer.
- First part – enter the beginning of sentence
- Second part – enter the ending of the sentence
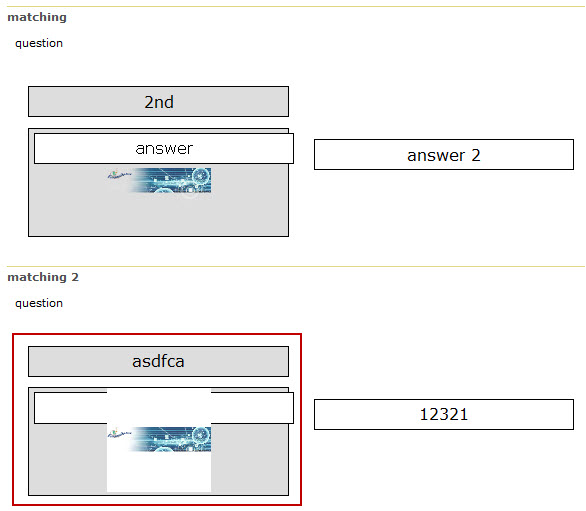
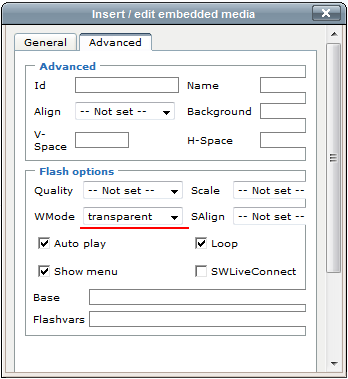
|
TIP: |
If you insert flash (swf) content it may not look good by default (see question 'matching 2')
To make it look nice (as it's shown in the Matching question above), set WMode of the Insert/edit embedded media editor to Transparent:
|
- Points - specify the number of points a user will get for this answer
- Click Add to add the option
- Feedback Settings – for more information about creating feedback messages, see Creating a Custom Feedback Message
- Hint Settings – enter a hint to help learners specify the right answer and the hint cost. If a hint is used, the number of question points will be reduced by the specified percent.
6. When finished, press Ok to save changes; press Cancel to discard changes. Click Next to save the current item and continue.
11.4.1.9 GAP FILL TYPE OF QUESTION
It is a question that consists of text with omitted words for the quiz. An empty space will appear in their place (a text box) where the student will have to insert the hidden word.

Fig. Gap Fill type of question
To add a Gap Fill question:
1. Enter the necessary course and click the Quizzes icon in the left Tools menu.
2. Point over the quiz you want to add a question to and select Settings. The Customize quiz page will appear.
3. In the Quiz Questions section select Add Question.
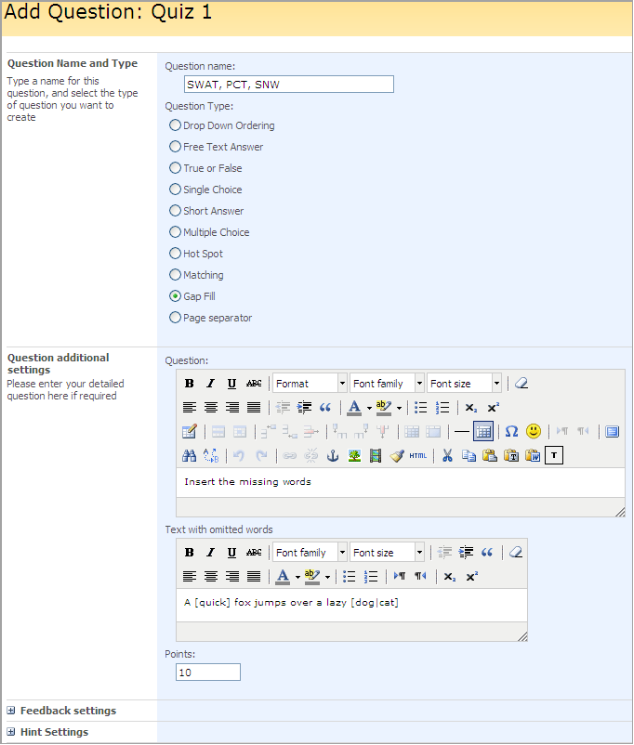
Fig. Adding a Gap Fill question
4. Fill out the form fields the following way:
o Question Name – enter the name of the question
o Question Type – select the Gap Fill radio button
o Question – enter the text of the question using the embedded editor to format the text
and use the second embedded editor field to inset the text with gaps, e.g.
A [quick] brown fox [jumps] over the lazy [dog|cat].
The word in [] brackets will be replaced by a text field, and the words separated by | slash will be displayed in the drop-down window (the first word in this case will be counted as the correct option, the rest as incorrect ones. The options will always be shown in random order).
o Points – specify the number of points a user will get for the correct answer. In this type of questions a question is answered correctly if all the gaps are filled with the correct answers.
o Feedback Settings – for more information about creating feedback messages, see Creating a Custom Feedback Message
o Hint Settings – enter a hint to help learners specify the right answer and the hint cost. If a hint is used, the number of question points will be reduced by the specified percent.
5. When finished press Ok to save changes; press Cancel to discard changes. Click Next to save the current item and continue.
When a user takes a quiz attempt he is able to switch the timer views in the top-left bar.
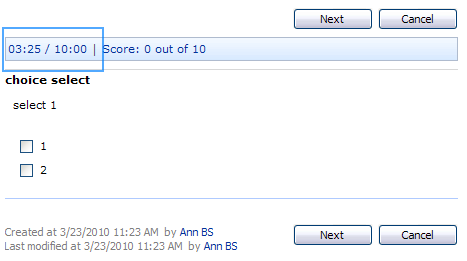
Fig. Switching timer views in the quiz attempt
By default quiz timer shows the spent time. If the ‘Attempt timeout’ is set in the quiz advanced settings then apart from spent time a user also can switch between:
o remaining time
o time spent / total time (like 01:39:40 / 05:08:20)
If the ‘Attempt timeout’ is not set in the quiz advanced settings the timer view cannot be switched and only shows the spent time.
SPLMS stores the user choice so when he refreshes page or starts a new attempt the system displays the favorite user view.
11.4.1.11 PAGE SEPARATOR
For your convenience you may insert page separator to separate questions from each other or create groups of questions.
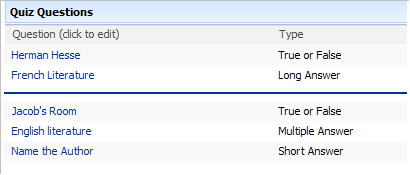
Fig. ‘Page Separator’
To add a page separator,
1. Enter the necessary course and click the Quizzes icon in the left Tools menu.
2. Point over the quiz you want to add a question to and select Settings. The Customize quiz page will appear.
3. In the Quiz Questions section select Add Question.
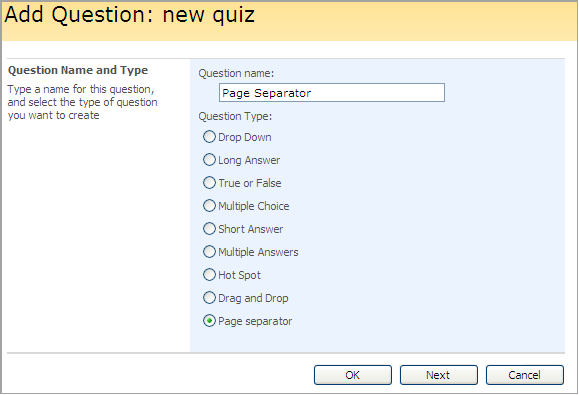
Fig. ‘Adding Page Separator’
4. In the Question Name field enter the name for the separator (the name will not be displayed).
5. From the Question Type list select Page Separator.
6. Click OK to save changes. Click Cancel to discard changes. Click Next to save the current item and continue.
To insert the separator into questions list,
1. Enter the necessary course and click the Quizzes icon in the Course Tools menu.
2. Point over the quiz you want to add a question to and select Settings. The Customize quiz page will appear.
3. In the Quiz Questions section select Change Questions order.
4. Select the position from top for the separator.
5. Save changes.
11.4.2 Adding Questions from a QTI Package
The system allows adding quiz questions from QTI packages.
|
NOTE: |
The system imports the following types of questions: Single Choice, Multiple Choice, Free Text Answer, Drop Down Ordering, Hot Spot, Matching, Gap Fill and Short Answer. |
To add the questions from a QTI package, do the following:
1. Enter the necessary course and press the Quizzes icon in the Course Tools menu
2. Find the necessary quiz and click its name
3. Select Settings from the drop-down menu
4. On the Quiz Questions tab, select Import Questions from QTI package. The upload form will appear.
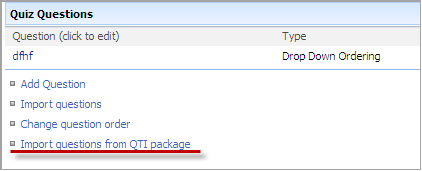
Fig. QTI Package
5. Select a package to be uploaded, and then click OK.
|
NOTE: |
Only QTI versions 2.0 and 2.1 are supported by SPLMS! |
6. The package questions will appear on the quiz settings page. You can start taking the quiz.