To make up a learning path, you should add a new learning path and configure it. The next steps should be followed:
1. Create the learning path.
2. Add Items to the learning path.
Step 1: Creating a Learning Path
1. Enter the necessary course and press the Learning Path link in the left Tools menu.
2. Press the Create button at the top of the page.
3. Click the Learning Path link.
4. In the opened form specify the fields as described below:
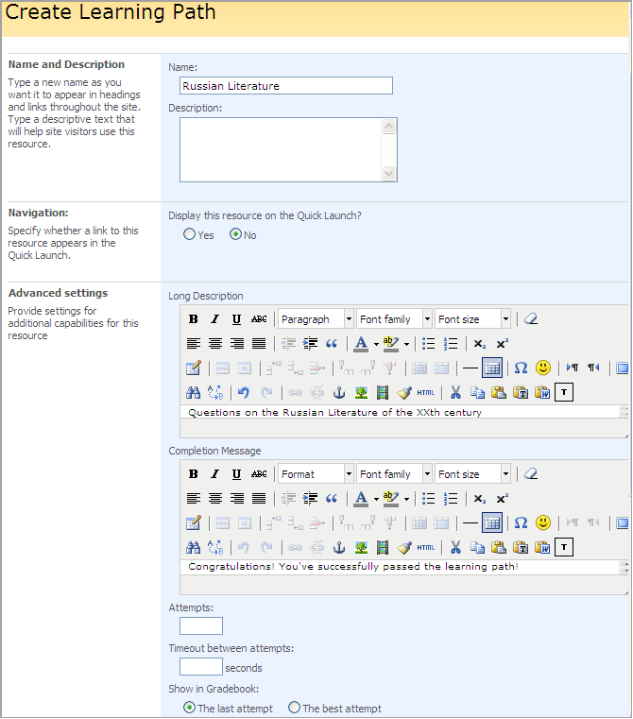
Fig. ‘Creating Learning Path. Step I’
- Name – enter the name of the learning path;
- Description – enter the short description of the learning path that will be displayed on the main page of the section;
- Navigation – select Yes if you want the resource to be displayed in the Quick Launch;
Advanced Settings
- Long Description – enter the long description of the learning path that will be displayed when passing the learning path;
- Completion Message – enter the text that will be displayed once the learning path has been passed;
- Attempts – specify the number of attempts learners can use to take the learning path
- Timeout between attempts – specify the period between attempts
- Show in Grade Book – specify whether you want the last or the best attempt to display in the Grade Book section
- Certification – select Yes to enable certification for this learning path. Use the Browse button to select certificate template for the learning path.
- Publishing – specify publishing options for the course.
Once done, press the Ok button at the bottom of the page to save the learning path. The Add Item page will appear. (Click Cancel to discard changes).
This page allows adding items to you learning path. When you create a new learning path the Add Item page is opened automatically.
To add an item to the existing learning path:
1. Enter the necessary course and press the Learning Path link in the left Tools menu.
2. Click the name of the necessary learning path and select Settings. The Customize Learning Path page will appear.
3. Click the Add Item link in the Learning Path section.
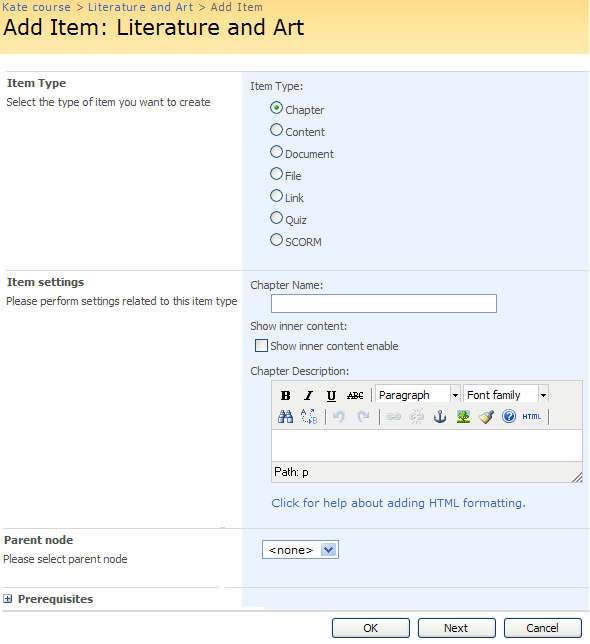
Fig. ‘Creating Learning Path. Step II’
On this page you may add items to the learning path and specify details for those items.
- From the Item Type list select the type of item you want to add.
- In the Item settings section specify settings for the item. These settings depend on the item you’ve chosen from the Item Type list.
- From the Parent Node drop-down list you may select parent item for the item you add.
- In the Prerequisites field check the boxes next to the items of the learning path that learner must complete before starting the chapter you are creating. There you’ll find a list of already saved items.
|
NOTE: |
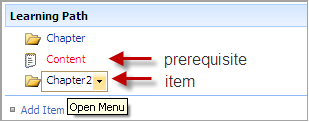
To view item prerequisites, select Settings from the drop down menu of a necessary Learning Path. Hovering over an item will highlight the item’s prerequisites in red.
|
When finished press OK at the bottom of the page to save the item, click Next to save current item and continue, click Cancel to discard changes.
Find below detailed description of each item type settings.
Chapter
You have the possibility to divide a learning path into chapters. A chapter is created as a general item (refer to Step 2: Add Item)
- From the Item Type list select the Chapter option, then enter name for the chapter in the Chapter Name field.
- Select the Show inner content checkbox if you want chapter inner content to be displayed.
- Use the embedded editor to create chapter description.
Content
To add a new item to the learning path, refer to Step 2: Add Item.
- From the Item Type list select the Content option.
- In the Title field enter content title.
- Use the embedded content editor to create content.
Document
To add a new item to the learning path, refer to Step 2: Add Item.
- From the Item Type list select the Document option.
- In the File Name field select the document you want to add to the learning path. The list will comprise files that have been created or uploaded to the Documents section of the course.
File
To add a new item to the learning path, refer to Step 2: Add Item.
- Use the Browse button to select a file on your computer. Click Upload to upload the file. You may upload as many files as you want to. The files you’ve uploaded will appear in the File Name drop-down list.
- From the File Name drop-down list select the file you want to add to the learning path. To delete a file from the list select the file and click the Delete button against the File field.
|
NOTE: |
The system supports the following file formats: .txt, .gif, .png, .tiff, .jpg", .jpeg, .bmp, .ico, .ima, .img, .wma, .mp3, .wav, .wmv, .mpeg, .mpg, .asf, .swf, .avi. |
Link
To add a new item to the learning path, refer to Step 2: Add Item.
- Choose the necessary links from the Link drop-down menu. The list will comprise quizzes that have been created in the Links section of the course.
Quiz
To add a new item to the learning path, refer to Step 2: Add Item.
- Choose the necessary quizzes from the Quiz drop-down menu. The list will comprise quizzes that have been created in the Quizzes section of the course.
- Enter the percent of right answers which is necessary to pass the learning path in the Percent to Pass field
- Specify whether you want the system to display quiz Last attempt or Best Attempt in case you would like to take a learning path again
SCORM
To add a new item to the learning path, refer to Step 2: Add Item.
- From the SCORM drop-down list select the SCORM you want to include into the learning path
- Specify whether you want the system to display SCORM Last attempt or Best Attempt in case you would like to take a learning path again
LRM
To add a new item to the learning path, refer to Step 2: Add Item
- From the LRM drop-down list select the LRM you want to include into the learning path
- Specify whether you want the system to display LRM Last attempt or Best Attempt in case you would like to take a learning path again
To edit the item:
1. Enter the necessary course and press the Learning Path link in the left Tools menu.
2. Find the necessary learning path and press its name.
3. Select Settings from the drop-down menu.
4. In the Learning Path section find the item you need to edit.
5. Point over the item and select Edit.
6. Change the current item to another one you need.
7. Save the changes.
9.2.2 Specifying Item Prerequisites
To specify prerequisites of the item:
1. Enter the necessary course and press the Learning Path link in the left course menu.
2. Find the necessary learning path and press its name.
3. Select Settings from the drop-down menu.
4. In the Learning Path section find the item you need to edit.
5. Point over the item and select Edit.
6. In the Prerequisites section check the boxes next to the items you want user to pass before the current item.
7. Save the changes by pressing the Ok button.
To move an item,
1. Enter the necessary course and press the Learning Path link in the left course menu.
2. Find the necessary learning path and press its name.
3. Select Settings from the drop-down menu.
4. In the Learning Path section find the item you need to edit.
5. Point over the item and select Move up ( ) or Move down (
 ) to change the item’s position.
To delete an item,
1. Enter the necessary course and press the Learning Path link in the left course menu.
2. Find the necessary learning path and press its name.
3. Select Settings from the drop-down menu.
4. In the Learning Path section find the item you need to delete.
5. Point over the item and select Delete.
6. Confirm the deletion.
9.2.5 Editing Learning Path’s Properties
To edit the created learning path’s properties,
1. Enter the necessary course and press the Learning Path link in the left course menu.
2. Find the necessary learning path and press its name.
3. Select Settings from the drop-down menu.
4. In the General Settings section click the settings you want to change.
5. Make the necessary changes and click Save.
9.2.6 Saving Learning Path as Template
Save learning path as a template – click this link if you want to save the learning path as a template. The following form will appear:
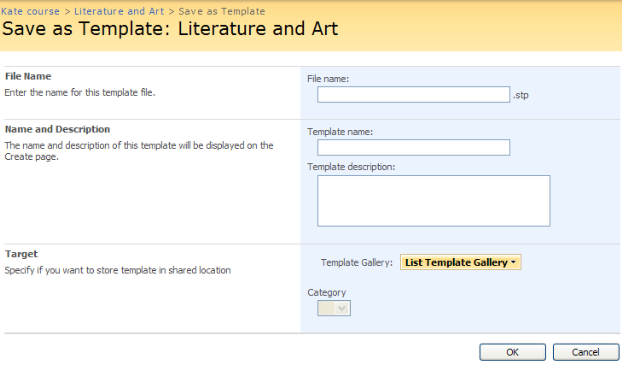
Fig. ‘Save as a Template’
Fill out the form fields as described below:
- File Name – enter the name for the template file;
- Template Name – enter name of the template. This name will appear on the Create page;
- Template Description – enter the description for the template.
- Click the Template Gallery button and choose the gallery you want to save the template to.
- From the Category drop-down list select category for the learning path template.
- Click OK to save changes.
This option creates a list template that is stored in the Site Actions>Site settings>Galleries>List Templates gallery of the course site collection.
To create a Learning Path from this template, do the following steps:
1. Enter the Learning Path course tool
2. Click the Create button
3. Click your template name
4. Fill in the name, description, quick launch option and press Next. You will be redirected to the new Learning Path from template all items page.
9.2.7 Saving Learning Path as Template Including Content
Saving Learning Path including content option allows you to save and reuse the learning path template with included items (chapters, content, quizzes, files, documents, SCORMSs, etc).
To save a learning path as template including content select requires learning path in the list, from the drop-down menu choose Settings. In the opened page click Save learning path as template incl. content:
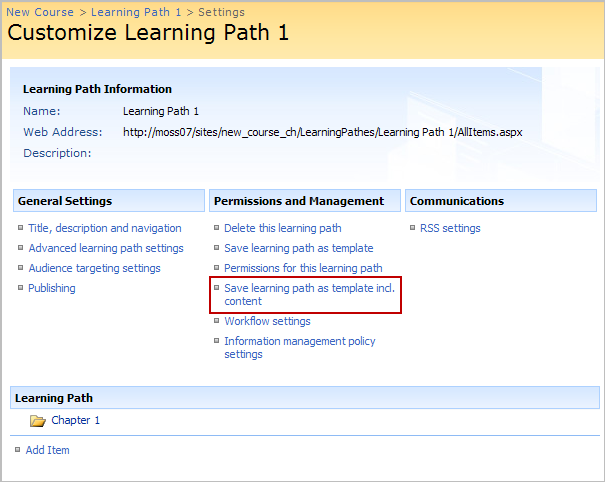
Fig. Saving learning path as template incl. content
If a learning path is saved using this option the template is stored in Site Actions>Site settings>Course Settings>Learning Path Templates list.
To create a Learning Path from this template enter Learning Path course tool and choose Create > Learning Path from Template.

Fig. Creating Learning Path from Template
- Select the template you saved
- Enter the name, description.
- When you apply this template you can either choose to replace identical items from template or not:
If the option is checked then course items with identical URLs will be replaced by the items from the template (in case they intersect). E.g. if you already have Quiz_1 in your course quizzes, and the template also contains Quiz_1 item, they will intersect and it will be either replaced with the one that’s stored in the template or not.
9.2.8 Reusing Learning Path Template on Another Course (Same or Different SharePointLMS Installation)
To be able to reuse the templates on other courses (belonging to other organizations or located in another farm) you will need to perform the following steps:
1. Save Learning Path as template (see the Saving Learning Path as Template and Saving Learning Path as Template Including Content paragraphs)
2. Find and download the learning path template in (it’s an .stp file):
· Site Actions>Site settings>Galleries>List Templates gallery if you used the Save Learning Path as Template option
· Actions>Site settings>Course settings>Learning Path Templates list if you used Save Learning Path as Template Including Content option
3. Open the course where you want to reuse this template
4. Open the same gallery or list and upload the saved template there
Go to the course Learning Path tool and create a new one from the template you uploaded