Each student enrolled into your course belongs to a certain group. To work with the list of user groups enter the necessary course and click the Users & Group icon in the left course menu. The system will display a list of available user groups:
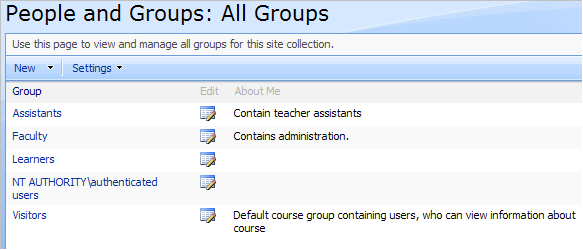
Fig. ‘List of User Groups’
To view the list of group users or work with properties of a certain user group, click its name in the list and select View or Edit from the context menu.
|
TIP: |
For better representation, you can modify the list view. Column names at the top of the list are clickable and allow you to sort user groups in ascending or descending order: · Use the Group or E-mail links to sort or filter groups by corresponding criteria; · Use the Edit icon to modify the item; · The About Me link allows viewing user groups description; · To remove filter criteria, click the necessary link in the column head and select Clear filter from option from the context menu. |
25.1.1 Creating Custom User Groups
To create a new user group:
1. Enter the necessary course and click the Users & Groups icon in the left course menu. The system will display a list of available user groups.
2. Click the New button in the header of the page and select New Group to create a new Sharepoint group. The system will display the following form:

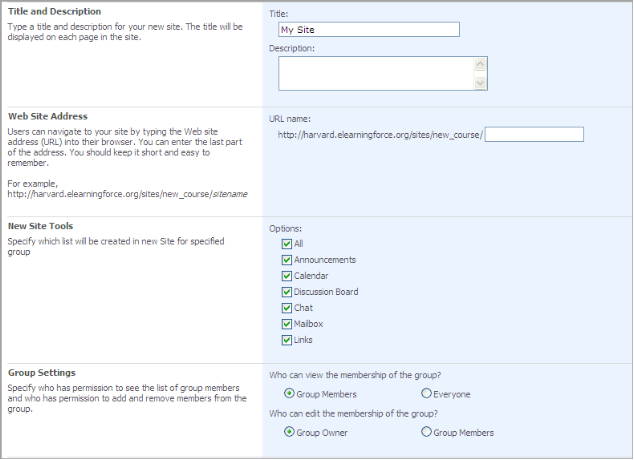
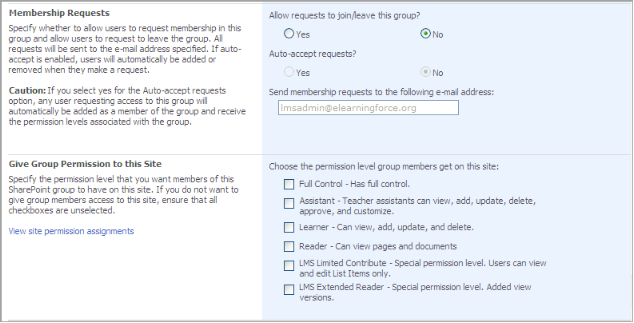
Fig. ‘Creating a New User Group’
3. Fill out the forms as described below:
- Name and About Me Description – enter group’s name and description;
- Owner – define the owner of the course. You may as well use the Check names and Browse icons to search and find the needed users;
- Additional Options – you can create assignments for Course resources and add workspace for the group;
- Title and Description – enter the title and description for a new site;
- Web Site Address – type in the name of your site;
- New Site Tools - specify which list will be created for the specified group;
- Group Settings – specify who has permission to see the list of group members and who has permission to add and remove members from the group with the help of the corresponding radio buttons;
- Membership Requests – specify whether to allow users to request membership in this group and allow users to request to leave the group. All requests will be sent to the e-mail address specified in the text field. If auto-accept is enabled, users will automatically be added or removed when they make a request. Select between Yes and No radio buttons.
- Give Group Permission to This Site – specify the permission level that you want members of this SharePoint group to have on this site.
4. Click Create to create a user group; click Cancel to discard changes.
|
Note: |
Every Course tool (list/library) does not inherit the permissions from the Course site collection BUT When you create Group in your Course with assigned SharePointLMS Learner or Teacher Assistant Permission level it will be automatically applied for every Course Tool. |
5. To associate specific AD Group with created SharePoint Group enter the SharePoint Group you have created and choose “New – Add Users” menu. In the appeared interface add Active Directory Group name and select SharePoint group to be associated with.
To view a group:
1. Enter the necessary course and click the Users & Group Management icon in the left course menu. The system will display a list of available user groups.
2. Click the required group name and open the list of users belonging to the group. The system will open the list of users belonging to the group.
3. At the top of the list click Settings and select one of the following options from the context menu:
§ Group Settings to modify group properties (see the Creating User Groups for details). To delete the group, open the group form and click the Delete button.
§ View Group Permissions to view the group permission levels set for various sections (modules) on the course web site.
§ Edit Group Quick Launch to specify which groups should be listed in the left pane of the People and Groups page for this course web site. Add or remove groups as required.
§ Set Up Groups to set up groups and permission levels for the course web site.
§ List Settings to change settings of the user groups list.
§ Course Groups to choose SharePoint groups which appear learners in the course.
25.1.3 Setting up Course Groups
The option allows you to bring together SharePoint learners groups you create by adding them to the Learners group.
1. Enter the necessary course.
2. Click the Learners&Groups link in the left course menu. The list of available user groups will be shown in the main workspace area.
3. Click any group name. The system will open the list of users belonging to the group.
4. At the top of the list click Settings and select the Set Up Groups option. The following form will be opened:
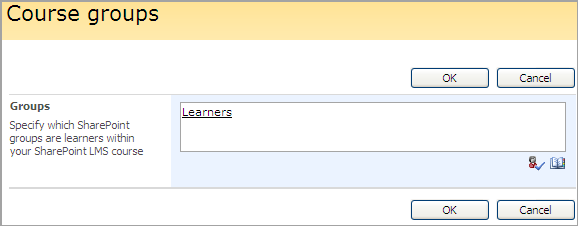
Fig. ‘Setting Up Groups’
5. Fill in the form field by specifying which SharePoint groups are learners within your SharePoint course:
§ If you want to add several groups, separate their names by semicolon. Note that you can add only those groups which are already registered in the system.
6. When finished, click OK to save changes; click Cancel to discard changes and close the form.
SharePointLMS allows setting up quick course joining for users who want to become members of course groups.
To configure settings,
1. Enter the Learners and Groups section
2. Click the name of a group you want to configure the quick joining for. A list of group users will appear
3. Press the Settings button and select Group Settings
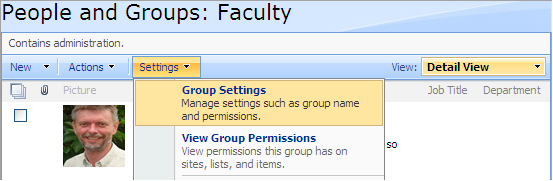
Fig. Group Settings
4. Configure the Membership Requests settings
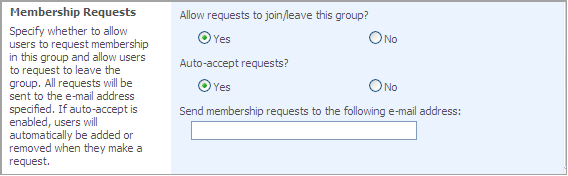
Fig. Membership Settings
- Allow requests to join/leave the group? – select Yes to allow requests
- Auto-accept requests? – select Yes to enable users join groups automatically. To enable requests approval, select No and specify the e-mail address for membership requests.
For further instructions, see paragraph Joining a Course.