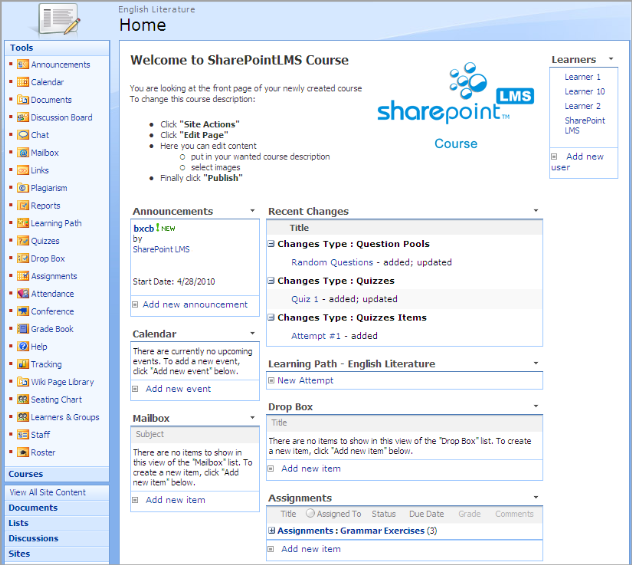
The Course Home page is displayed when user clicks a link of a necessary course on the Home Page.

Fig. 'Course Home Page'
The Course Home page displays general description of a course, and gives a user an access to basic modules of the course. To access course modules, click a corresponding icon in the Course Tools menu:
|
Name |
Description |
|
Announcements |
Allows managing course announcements |
|
Calendar |
Allows posting events to notify other users |
|
Documents |
Allows working with course documents |
|
Learning Path |
Allows managing course learning paths |
|
Links |
Allows managing course links |
|
Quizzes |
Allows managing course quizzes |
|
Drop Box |
Allows managing files for shared usage |
|
Plagiarism |
Allows checking items for plagiarism |
|
Assignments |
Allows setting course home tasks |
|
Attendance |
|
|
Discussion Board |
Brings users to the course forum |
|
Chat |
Brings users to the course chat room |
|
Conference |
|
|
GradeBook |
Allows setting grades for course students |
|
Tracking |
Allows tracking statistics within course modules |
|
Wiki Page Library |
Allows creating documents users want to share with other course members |
|
Seating Chart |
Allows creating a class seating chart |
|
Reports |
Allows scheduling report on attendance and time spent by learners in each course section |
|
Mailbox |
Allows managing message sharing |
|
Learners & Groups |
|
|
Staff |
Contains information about course teachers, administrators, faculty staff etc |
|
Roster |
Contains information about course learners |
|
Help |
Displays online SharepointLMS documentation |
|
Podcasts |
Allows integrating podcasts into site collections |
Items of the Course Tools menu are enabled on the Course Options page. To enter Course Options, go to Site Actions > Course Settings > Course Options.
The Course Home page may display main modules of the course, i.e. Web Parts so that users can have easy access to them.
More information about Course Web Parts you can find in the Web Parts on the Course Level section.
Customizing Course Home Page
You can customize the visual representation of the Course Home page. To be able to make changes:
1. Open the Course Home page.
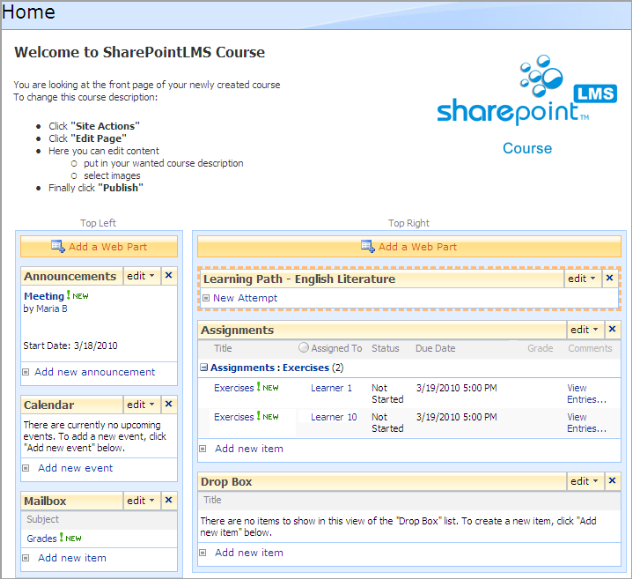
2. In the Site Actions menu, select Edit Page. You will be switched to the edit mode:

Fig. ‘Editing Course Home Page’
3. Make the necessary changes to the page:
- At the top of the page enter the page name
- Use the HTML editor to create description of the course. This description will be displayed at the top of the Course Home Page.
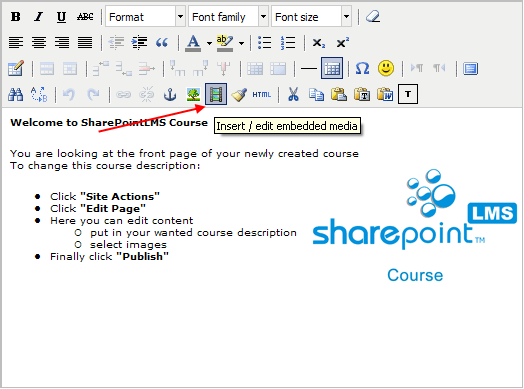
- Also you can insert a multimedia content at the top of the page using the Insert/edit embedded media tool:

Fig. ‘Insert/Edit Embedded Media’
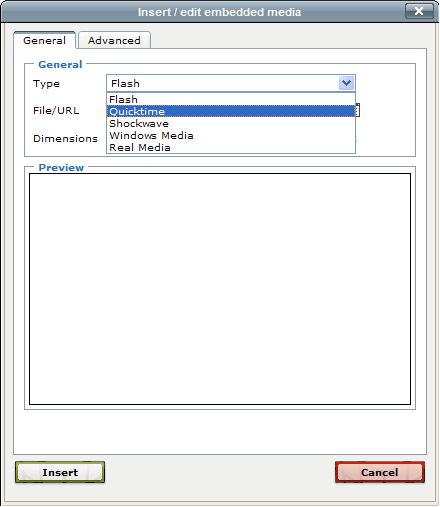
The Insert/edit embedded media editor window will open:

Fig. ‘Insert/Edit Embedded Media Editor’
Select the file type depending of the extension of the required file:
|
File Type |
File Extension |
|
Flash |
.swf |
|
Quicktime |
.mov .qt |
|
Shockwave |
.DCR |
|
Windows Media |
.wmv .avi |
|
Real Media |
.rm |
Enter the URL of the file or select the file from the library using the Browse button ( )
)
Specify the file dimension. Click Insert.
You can see that the page is divided into panes: Right, Top Left, Top Right, Center Left, Center, Center Right, and Footer. You can find information about Web Parts managing in the Managing Web Parts section.